Sm64ex is one of the native ports of Super Mario 64 to the PC. These ports are based on decompiled code from the Nintendo 64 game, enhanced and re-compiled for PC, so they run light and smooth without the overhead and limitations of emulation. To build the final game, you must supply a legally-acquired ROM of Super Mario 64 so that the assets can be extracted and compiled into sm64ex. Therefore a pre-built version cannot be distributed: the end-user must compile sm64ex themselves.
Using Nix, we can easily build our own copy. This has the following advantages:
- Using flake.lock we'll be able to freeze the versions of all build and runtime dependencies, enabling us to rebuild exactly the same version on other Steam Decks, or after wiping our Steam Deck for a clean install.
- All the built and installed packages will be stored under
/nixso it won't alter or interfere with SteamOS and we can easily removenixand everything installed through it by deleting/nix. - We can optionally store our nix config and
flake.lockingitso we can roll back to any previous version of our nix config and packages.
Install Nix
"Nix" is the name of:
- A programming language
- A package manager
- A Linux distribution
We are going to be installing Nix the package manager on SteamOS, and then writing a config in Nix the programming language. While NixOS is by far the best way to use Nix, I want my Deck to stay on SteamOS because I like the idea of having a Valve-managed standardized gaming appliance.
I recommend either setting up ssh access to your deck from another machine, or plugging your steam deck into a dock with a keyboard and mouse attached. This will be deeply tedious with the on-screen keyboard and touch screen.
First, enter desktop-mode and get to a terminal. We are going to be doing a single-user install, so we need to chown the /nix directory since it currently belongs to root. If you haven't set a password for the deck user yet, then set one so we can use sudo:
passwd
|
Then chown the /nix directory:
sudo chown -R deck:deck /nix
|
Then we need to download the Nix installer script and run it:
wget https://nixos.org/nix/install
|
# Read the install script and make sure you trust it. Then:
|
sh install --no-daemon
|
Now either re-launch your terminal or re-launch your ssh shell to get your environment variables set up. This will:
- Add
/home/deck/.nix-profile/binto yourPATH - Add
/home/deck/.nix-profile/shareand/nix/var/nix/profiles/default/sharetoXDG_DATA_DIRS - Set
NIX_SSL_CERT_FILE=/etc/ssl/certs/ca-certificates.crt - Set
NIX_PROFILES=/nix/var/nix/profiles/default /home/deck/.nix-profile
Start a Nix config with Flakes and Home-manager
We're going to store our config at ~/.config/mynix, so we create that directory and then write a few config files to it:
mkdir ~/.config/mynix
|
And then inside there write a flake.nix.
{
|
description = "My system configuration";
|
|
inputs = {
|
nixpkgs.url = "github:nixos/nixpkgs/nixpkgs-unstable";
|
home-manager = {
|
url = "github:nix-community/home-manager";
|
inputs.nixpkgs.follows = "nixpkgs";
|
};
|
};
|
outputs =
|
{
|
nixpkgs,
|
home-manager,
|
...
|
}:
|
let
|
system = "x86_64-linux";
|
pkgs = import nixpkgs {
|
inherit system;
|
};
|
in
|
{
|
defaultPackage.${system} = home-manager.defaultPackage.${system};
|
homeConfigurations."deck" = home-manager.lib.homeManagerConfiguration {
|
inherit pkgs;
|
|
modules = [
|
{
|
home.username = "deck";
|
home.homeDirectory = "/home/deck";
|
home.stateVersion = "24.11";
|
|
programs.home-manager.enable = true;
|
|
# Enable flakes
|
nix = {
|
package = pkgs.nix;
|
settings.experimental-features = [
|
"nix-command"
|
"flakes"
|
];
|
};
|
# Automatic garbage collection
|
nix.gc = {
|
# Runs nix-collect-garbage --delete-older-than 30d
|
automatic = true;
|
randomizedDelaySec = "14m";
|
options = "--delete-older-than 30d";
|
};
|
# Deduplicate files in nix store
|
nix.settings.auto-optimise-store = true;
|
}
|
];
|
};
|
};
|
}
|
This config sets up home-manager with flakes and enables automatic garbage collection to clean up old builds in the nix store.
Then we need to apply the config:
nix --extra-experimental-features 'nix-command flakes' run /home/deck/.config/mynix -- --extra-experimental-features 'nix-command flakes' switch --flake /home/deck/.config/mynix
|
That's quite the cumbersome command, but after it has been run once it will enable nix-command and flakes so the next time we want to apply the config we will only have to run:
nix run /home/deck/.config/mynix -- switch --flake /home/deck/.config/mynix
|
or
home-manager switch --flake /home/deck/.config/mynix
|
It may complain about the user systemd session being in a degraded state. That is because these units were in a degraded state before Nix was even installed. You can ignore this error:
The user systemd session is degraded:
|
UNIT LOAD ACTIVE SUB DESCRIPTION
|
● app-firewall\x2dapplet@autostart.service loaded failed failed Firewall Applet
|
● obex.service loaded failed failed Bluetooth OBEX service
|
The first run of this command generates a file called flake.lock which stores the revisions for all of our dependencies so if we install this config with this flake.lock on another machine, it will have exactly the same versions of everything.
Install sm64ex
We need to update our config to install sm64ex. To do that, first lets tell flake.nix to load a separate file by adding ./sm64ex.nix to the modules list.
{
|
description = "My system configuration";
|
|
inputs = {
|
nixpkgs.url = "github:nixos/nixpkgs/nixpkgs-unstable";
|
home-manager = {
|
url = "github:nix-community/home-manager";
|
inputs.nixpkgs.follows = "nixpkgs";
|
};
|
};
|
outputs =
|
{
|
nixpkgs,
|
home-manager,
|
...
|
}:
|
let
|
system = "x86_64-linux";
|
pkgs = import nixpkgs {
|
inherit system;
|
};
|
in
|
{
|
defaultPackage.${system} = home-manager.defaultPackage.${system};
|
homeConfigurations."deck" = home-manager.lib.homeManagerConfiguration {
|
inherit pkgs;
|
|
modules = [
|
{
|
home.username = "deck";
|
home.homeDirectory = "/home/deck";
|
home.stateVersion = "24.11";
|
|
programs.home-manager.enable = true;
|
|
# Enable flakes
|
nix = {
|
package = pkgs.nix;
|
settings.experimental-features = [
|
"nix-command"
|
"flakes"
|
];
|
};
|
# Automatic garbage collection
|
nix.gc = {
|
# Runs nix-collect-garbage --delete-older-than 30d
|
automatic = true;
|
randomizedDelaySec = "14m";
|
options = "--delete-older-than 30d";
|
};
|
# Deduplicate files in nix store
|
nix.settings.auto-optimise-store = true;
|
}
|
./sm64ex.nix
|
];
|
};
|
};
|
}
|
And we need to create a ~/.config/mynix/sm64ex.nix:
{
|
config,
|
lib,
|
pkgs,
|
...
|
}:
|
|
{
|
imports = [ ];
|
|
config = {
|
home.packages = with pkgs; [
|
sm64ex
|
];
|
|
# Allow installing sm64ex even though it is marked as non-free
|
nixpkgs.config.allowUnfreePredicate =
|
pkg:
|
builtins.elem (lib.getName pkg) [
|
"sm64ex"
|
];
|
};
|
}
|
But we can't apply the config just yet. The sm64ex package is expecting that we already have a baserom.us.z64 added to our nix store. Legally rip your baserom.us.z64 and add it to your nix store via:
nix-store --add-fixed sha256 baserom.us.z64
|
Then we apply the config:
home-manager switch --flake /home/deck/.config/mynix
|
This will compile sm64ex and install it. But there's two problems we can immediately notice:
- It does not run when launched.
- There is no convenient way to launch it.
We will be solving these by creating a .desktop file, introducing nixGL, and writing a wrapper script that makes sm64ex launch from within steam gaming mode properly.
Adding nixGL
If we were running NixOS, graphical programs would work out-of-the-box. Unfortunately on other Linux distributions, we need to wrap our graphical programs so they know where to find the graphics drivers. To perform this wrapping, we will use nixGL. To install nixGL we need to add it as an input in our flake.nix, apply its overlay, and add it as an extraSpecialArgs to have it automatically passed into each module:
{
|
description = "My system configuration";
|
|
inputs = {
|
nixpkgs.url = "github:nixos/nixpkgs/nixpkgs-unstable";
|
home-manager = {
|
url = "github:nix-community/home-manager";
|
inputs.nixpkgs.follows = "nixpkgs";
|
};
|
nixgl = {
|
url = "github:nix-community/nixGL";
|
inputs.nixpkgs.follows = "nixpkgs";
|
};
|
};
|
outputs =
|
{
|
nixpkgs,
|
home-manager,
|
nixgl,
|
...
|
}:
|
let
|
system = "x86_64-linux";
|
pkgs = import nixpkgs {
|
inherit system;
|
overlays = [ nixgl.overlay ];
|
};
|
in
|
{
|
defaultPackage.${system} = home-manager.defaultPackage.${system};
|
homeConfigurations."deck" = home-manager.lib.homeManagerConfiguration {
|
inherit pkgs;
|
|
extraSpecialArgs = { inherit nixgl; };
|
|
modules = [
|
{
|
home.username = "deck";
|
home.homeDirectory = "/home/deck";
|
home.stateVersion = "24.11";
|
|
programs.home-manager.enable = true;
|
|
# Enable flakes
|
nix = {
|
package = pkgs.nix;
|
settings.experimental-features = [
|
"nix-command"
|
"flakes"
|
];
|
};
|
# Automatic garbage collection
|
nix.gc = {
|
# Runs nix-collect-garbage --delete-older-than 30d
|
automatic = true;
|
randomizedDelaySec = "14m";
|
options = "--delete-older-than 30d";
|
};
|
# Deduplicate files in nix store
|
nix.settings.auto-optimise-store = true;
|
|
# Enable the nixGL wrappers
|
nixGL.packages = nixgl.packages;
|
}
|
./sm64ex.nix
|
];
|
};
|
};
|
}
|
And then to apply the nixGL wrapper to sm64ex we need to wrap our package install with config.lib.nixGL.wrap in sm64ex.nix:
{
|
config,
|
lib,
|
pkgs,
|
...
|
}:
|
|
{
|
imports = [ ];
|
|
config = {
|
home.packages = with pkgs; [
|
(config.lib.nixGL.wrap sm64ex)
|
];
|
|
# Allow installing sm64ex even though it is marked as non-free
|
nixpkgs.config.allowUnfreePredicate =
|
pkg:
|
builtins.elem (lib.getName pkg) [
|
"sm64ex"
|
];
|
};
|
}
|
Apply the config with:
home-manager switch --flake /home/deck/.config/mynix
|
and we should be able to launch sm64ex from the terminal in desktop-mode. Unfortunately, the Steam Deck built-in controls behave oddly in desktop mode, so unless you're using a separate stand-alone controller, you will probably want it set up to run in Steam gaming-mode where the controls behave normally.
Adding a .desktop file
The first step to getting sm64ex running in gaming-mode is to create a .desktop file. .desktop files are small files with a bit of metadata about a program which can be used by programs such as your "start" / applications menu or an installed program list in Steam.
To add a .desktop file to the sm64ex package, we are going to use an "overlay". This overlay will replace the sm64ex package with a new one we create with the buildEnv function. This new package will contain the nixGL-wrapped version of the original sm64ex package and the .desktop file. We will create the .desktop file using the makeDesktopItem function.
First, we need to find a suitable icon. I used a 256x256 PNG from SteamGridDB. Download whichever icon you want to ~/.config/mynix/icon.png. Then we can update our sm64ex.nix to:
{
|
config,
|
lib,
|
pkgs,
|
...
|
}:
|
|
{
|
imports = [ ];
|
|
config = {
|
home.packages = with pkgs; [
|
sm64ex
|
];
|
|
# Allow installing sm64ex even though it is marked as non-free
|
nixpkgs.config.allowUnfreePredicate =
|
pkg:
|
builtins.elem (lib.getName pkg) [
|
"sm64ex"
|
];
|
|
nixpkgs.overlays = [
|
(final: prev: {
|
sm64ex =
|
let
|
desktop_item = pkgs.makeDesktopItem {
|
name = "sm64ex";
|
desktopName = "Super Mario 64";
|
comment = "A PC Port of Super Mario 64.";
|
categories = [
|
"Game"
|
];
|
icon = "sm64ex";
|
type = "Application";
|
exec = "sm64ex";
|
};
|
in
|
pkgs.buildEnv {
|
name = prev.sm64ex.name;
|
paths = [
|
(config.lib.nixGL.wrap prev.sm64ex)
|
];
|
# We have to use 555 instead of the normal 444 here because the .desktop file ends up inside $HOME on steam deck and desktop files must be either not in $HOME or must be executable, otherwise KDE Plasma refuses to execute them.
|
postBuild = ''
|
install -m 555 -D "${desktop_item}/share/applications/"* -t $out/share/applications/
|
install -m 444 -D "${./icon.png}" $out/share/pixmaps/sm64ex.png
|
'';
|
};
|
})
|
];
|
};
|
}
|
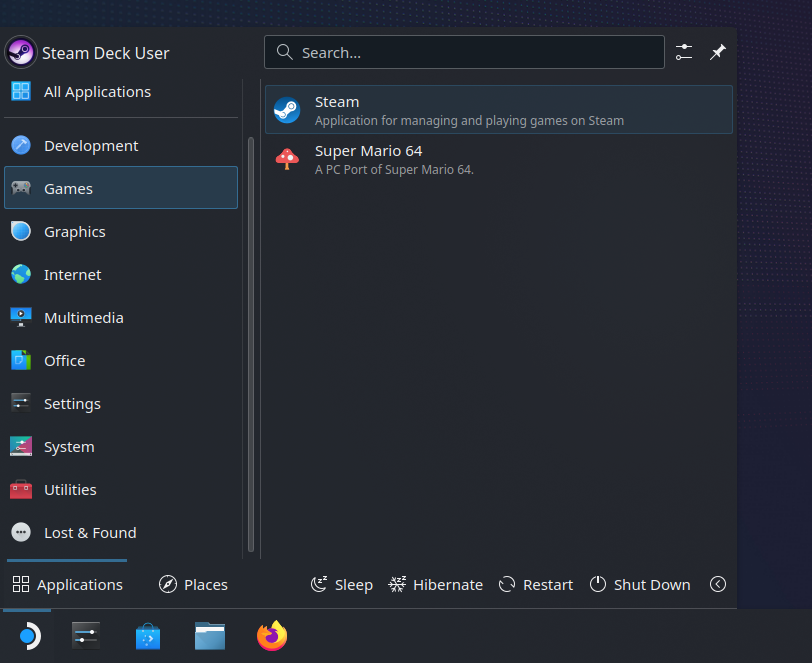
At this point, reboot to reload the .desktop files and go back into desktop-mode. You will see sm64ex in your Start/Applications menu under the "Game" category.
Adding a Steam wrapper
To get controls that work correctly, we still need to add sm64ex to Steam. Unfortunately, Steam messes with the environment variables, so we need to make a small wrapper script that ensures sm64ex can find libGL.so. To do this, we will create a package using the writeScriptBin function and install it with our other packages. Update sm64ex.nix to:
{
|
config,
|
lib,
|
pkgs,
|
...
|
}:
|
|
let
|
steam_sm64ex = pkgs.writeScriptBin "steam_sm64ex" ''
|
export LD_LIBRARY_PATH="$LD_LIBRARY_PATH:${pkgs.libglvnd}/lib"
|
exec ${pkgs.sm64ex}/bin/sm64ex
|
'';
|
in
|
{
|
imports = [ ];
|
|
config = {
|
home.packages = with pkgs; [
|
sm64ex
|
steam_sm64ex
|
];
|
|
# Allow installing sm64ex even though it is marked as non-free
|
nixpkgs.config.allowUnfreePredicate =
|
pkg:
|
builtins.elem (lib.getName pkg) [
|
"sm64ex"
|
];
|
|
nixpkgs.overlays = [
|
(final: prev: {
|
sm64ex =
|
let
|
desktop_item = pkgs.makeDesktopItem {
|
name = "sm64ex";
|
desktopName = "Super Mario 64";
|
comment = "A PC Port of Super Mario 64.";
|
categories = [
|
"Game"
|
];
|
icon = "sm64ex";
|
type = "Application";
|
exec = "sm64ex";
|
};
|
in
|
pkgs.buildEnv {
|
name = prev.sm64ex.name;
|
paths = [
|
(config.lib.nixGL.wrap prev.sm64ex)
|
];
|
# We have to use 555 instead of the normal 444 here because the .desktop file ends up inside $HOME on steam deck and desktop files must be either not in $HOME or must be executable, otherwise KDE Plasma refuses to execute them.
|
postBuild = ''
|
install -m 555 -D "${desktop_item}/share/applications/"* -t $out/share/applications/
|
install -m 444 -D "${./icon.png}" $out/share/pixmaps/sm64ex.png
|
'';
|
};
|
})
|
];
|
};
|
}
|
And apply the config with
home-manager switch --flake /home/deck/.config/mynix
|
Adding sm64ex to Steam
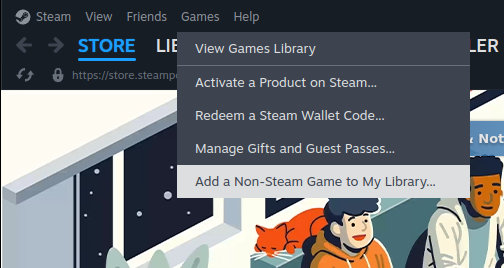
Finally, we need to tell Steam about sm64ex. Go into desktop-mode and launch Steam inside desktop-mode. Then go to "Add a Non-Steam Game to My Library".
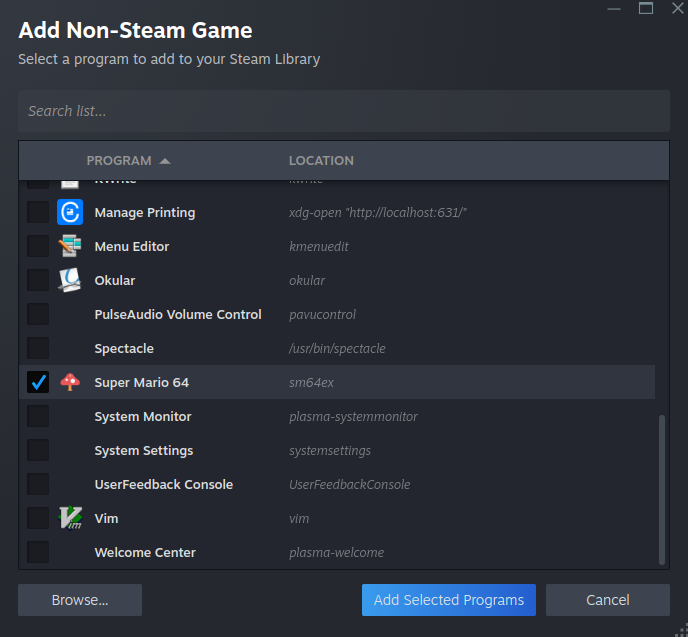
Then find sm64ex in the list and add it.
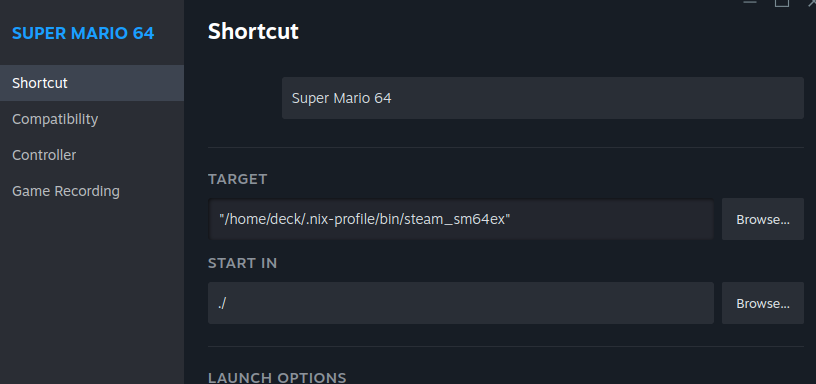
Then we need to edit the target, so find sm64ex in your Library, right click on it, and go to Properties.
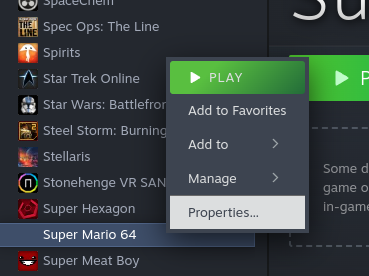
And update the target to our new wrapper script to: "/home/deck/.nix-profile/bin/steam_sm64ex".
Now you should be able to go back into gaming-mode and launch sm64ex from your Steam library. The controls should work correctly out-of-the-box.
Final Versions
Now you should be able to go back into gaming-mode and launch sm64ex from your Steam library. The controls should work correctly out-of-the-box.
Below are the final versions of our config, but you can also browse my full Steam Deck Nix config which includes sm64ex (Super Mario 64), Ship of Harkinian (Ocarina of Time), and 2Ship2Harkinian (Majora's Mask). It also moves the saves to "~/.persist" and loads my configs for each game into place and read-only.
~/.config/mynix/flake.nix
{
|
description = "My system configuration";
|
|
inputs = {
|
nixpkgs.url = "github:nixos/nixpkgs/nixpkgs-unstable";
|
home-manager = {
|
url = "github:nix-community/home-manager";
|
inputs.nixpkgs.follows = "nixpkgs";
|
};
|
nixgl = {
|
url = "github:nix-community/nixGL";
|
inputs.nixpkgs.follows = "nixpkgs";
|
};
|
};
|
outputs =
|
{
|
nixpkgs,
|
home-manager,
|
nixgl,
|
...
|
}:
|
let
|
system = "x86_64-linux";
|
pkgs = import nixpkgs {
|
inherit system;
|
overlays = [ nixgl.overlay ];
|
};
|
in
|
{
|
defaultPackage.${system} = home-manager.defaultPackage.${system};
|
homeConfigurations."deck" = home-manager.lib.homeManagerConfiguration {
|
inherit pkgs;
|
|
extraSpecialArgs = { inherit nixgl; };
|
|
modules = [
|
{
|
home.username = "deck";
|
home.homeDirectory = "/home/deck";
|
home.stateVersion = "24.11";
|
|
programs.home-manager.enable = true;
|
|
# Enable flakes
|
nix = {
|
package = pkgs.nix;
|
settings.experimental-features = [
|
"nix-command"
|
"flakes"
|
];
|
};
|
# Automatic garbage collection
|
nix.gc = {
|
# Runs nix-collect-garbage --delete-older-than 30d
|
automatic = true;
|
randomizedDelaySec = "14m";
|
options = "--delete-older-than 30d";
|
};
|
# Deduplicate files in nix store
|
nix.settings.auto-optimise-store = true;
|
|
# Enable the nixGL wrappers
|
nixGL.packages = nixgl.packages;
|
}
|
./sm64ex.nix
|
];
|
};
|
};
|
}
|
~/.config/mynix/sm64ex.nix
{
|
config,
|
lib,
|
pkgs,
|
...
|
}:
|
|
let
|
steam_sm64ex = pkgs.writeScriptBin "steam_sm64ex" ''
|
export LD_LIBRARY_PATH="$LD_LIBRARY_PATH:${pkgs.libglvnd}/lib"
|
exec ${pkgs.sm64ex}/bin/sm64ex
|
'';
|
in
|
{
|
imports = [ ];
|
|
config = {
|
home.packages = with pkgs; [
|
sm64ex
|
steam_sm64ex
|
];
|
|
# Allow installing sm64ex even though it is marked as non-free
|
nixpkgs.config.allowUnfreePredicate =
|
pkg:
|
builtins.elem (lib.getName pkg) [
|
"sm64ex"
|
];
|
|
nixpkgs.overlays = [
|
(final: prev: {
|
sm64ex =
|
let
|
desktop_item = pkgs.makeDesktopItem {
|
name = "sm64ex";
|
desktopName = "Super Mario 64";
|
comment = "A PC Port of Super Mario 64.";
|
categories = [
|
"Game"
|
];
|
icon = "sm64ex";
|
type = "Application";
|
exec = "sm64ex";
|
};
|
in
|
pkgs.buildEnv {
|
name = prev.sm64ex.name;
|
paths = [
|
(config.lib.nixGL.wrap prev.sm64ex)
|
];
|
# We have to use 555 instead of the normal 444 here because the .desktop file ends up inside $HOME on steam deck and desktop files must be either not in $HOME or must be executable, otherwise KDE Plasma refuses to execute them.
|
postBuild = ''
|
install -m 555 -D "${desktop_item}/share/applications/"* -t $out/share/applications/
|
install -m 444 -D "${./icon.png}" $out/share/pixmaps/sm64ex.png
|
'';
|
};
|
})
|
];
|
};
|
}
|
Sometimes it can be useful to build a graph of docker memory usage over time. For example, I was recently working on reducing the maximum memory of a long-running script. There certainly are heavy and complex options out there like setting up Prometheus and configuring docker to export metrics to it but I threw together a small python script, using only the python standard library, that outputs gnuplot code to render a graph.
Usage
Invoke the python script before starting any docker containers. Then, once a docker container is started, the script will start recording memory usage. Any additional docker containers that are started while the script is running will also get recorded. When no docker containers are left, the script will export gnuplot code over stdout that can then be rendered into a graph.
Each container will get its own line on the graph. All containers will have their start time aligned with the left-hand side of the graph as if they had started at the same time (so the X-axis it the number of seconds the docker container has been running, as opposed to the wall time).
If you'd like, you can insert a horizontal line at whatever memory quantity you'd like by uncommenting the horizontal_lines array below. This can be useful for showing a maximum limit like the paltry 32GiB offered by Cloud Run.
Example Invocation
$ ./graph_docker_memory.py | gnuplot > graph.svg
|
INFO:root:Waiting for a docker container to exist to start recording.
|
INFO:root:Recorded stat jovial_chandrasekhar: 528384 bytes
|
INFO:root:Recorded stat jovial_chandrasekhar: 528384 bytes
|
INFO:root:Recorded stat exciting_bohr: 512000 bytes
|
INFO:root:Recorded stat jovial_chandrasekhar: 516096 bytes
|
INFO:root:Recorded stat exciting_bohr: 512000 bytes
|
INFO:root:Recorded stat jovial_chandrasekhar: 561152 bytes
|
INFO:root:Recorded stat exciting_bohr: 512000 bytes
|
INFO:root:Recorded stat jovial_chandrasekhar: 561152 bytes
|
INFO:root:Recorded stat exciting_bohr: 4866441 bytes
|
INFO:root:Recorded stat jovial_chandrasekhar: 561152 bytes
|
INFO:root:Recorded stat exciting_bohr: 3166699 bytes
|
INFO:root:Recorded stat jovial_chandrasekhar: 561152 bytes
|
INFO:root:Recorded stat exciting_bohr: 3128950 bytes
|
INFO:root:Recorded stat jovial_chandrasekhar: 8568963 bytes
|
INFO:root:Recorded stat exciting_bohr: 3128950 bytes
|
INFO:root:Recorded stat jovial_chandrasekhar: 8528068 bytes
|
INFO:root:Recorded stat exciting_bohr: 3128950 bytes
|
INFO:root:Recorded stat jovial_chandrasekhar: 8528068 bytes
|
INFO:root:Recorded stat exciting_bohr: 32547799 bytes
|
INFO:root:Recorded stat jovial_chandrasekhar: 8528068 bytes
|
INFO:root:Recorded stat exciting_bohr: 4329570 bytes
|
INFO:root:Recorded stat jovial_chandrasekhar: 8528068 bytes
|
You can also throw tee in there to save the gnuplot file to make manual adjustments or to render in some other fashion:
./graph_docker_memory.py | tee graph.gnuplot | gnuplot > graph.svg
|
Output
The output from the above run would be:

And the gnuplot source:
set terminal svg background '#FFFFFF'
|
set title 'Docker Memory Usage'
|
set xdata time
|
set timefmt '%s'
|
set format x '%tH:%tM:%tS'
|
# Please note this is in SI units (base 10), not IEC (base 2). So, for example, this would show a Gigabyte, not a Gibibyte.
|
set format y '%.0s%cB'
|
set datafile separator "|"
|
|
plot "-" using 1:2 title 'exciting\_bohr' with lines, "-" using 1:2 title 'jovial\_chandrasekhar' with lines
|
0|512000
|
4|512000
|
9|512000
|
13|4866441
|
18|3166699
|
23|3128950
|
27|3128950
|
32|3128950
|
35|32547799
|
40|4329570
|
e
|
0|528384
|
5|516096
|
9|561152
|
14|561152
|
18|561152
|
23|561152
|
28|8568963
|
32|8528068
|
37|8528068
|
40|8528068
|
45|8528068
|
e
|
The script
#!/usr/bin/env python
|
from __future__ import annotations
|
|
import json
|
import logging
|
import re
|
import subprocess
|
from dataclasses import dataclass
|
from datetime import datetime
|
from time import sleep
|
from typing import Collection, Final, NewType, Tuple
|
|
ContainerId = NewType("ContainerId", str)
|
ContainerName = NewType("ContainerName", str)
|
|
SAMPLE_INTERVAL_SECONDS: Final[int] = 2
|
|
|
@dataclass
|
class Sample:
|
instant: datetime
|
stats: dict[ContainerId, Stats]
|
|
|
@dataclass
|
class Stats:
|
memory_usage_bytes: int
|
|
|
def main():
|
logging.basicConfig(level=logging.INFO)
|
samples: list[Sample] = []
|
labels: dict[ContainerId, ContainerName] = {}
|
first_pass = True
|
# First wait for any docker container to exist.
|
while True:
|
sample, labels_in_sample = take_sample()
|
if labels_in_sample:
|
break
|
if first_pass:
|
first_pass = False
|
logging.info("Waiting for a docker container to exist to start recording.")
|
sleep(1)
|
# And then record memory until no containers exist.
|
while True:
|
sample, labels_in_sample = take_sample()
|
if not labels_in_sample:
|
break
|
samples.append(sample)
|
labels = {**labels, **labels_in_sample}
|
sleep(SAMPLE_INTERVAL_SECONDS)
|
if labels:
|
# Draws a red horizontal line at 32 GiB since that is the memory limit for cloud run.
|
write_plot(
|
samples,
|
labels,
|
# horizontal_lines=[(32 * 1024**3, "red", "Cloud Run Max Memory")],
|
)
|
|
|
def write_plot(
|
samples: Collection[Sample],
|
labels: dict[ContainerId, ContainerName],
|
*,
|
horizontal_lines: Collection[Tuple[int, str, str | None]] = [],
|
):
|
starting_time_per_container = {
|
container_id: min(
|
(sample.instant for sample in samples if container_id in sample.stats)
|
)
|
for container_id in labels.keys()
|
}
|
print(
|
"""set terminal svg background '#FFFFFF'
|
set title 'Docker Memory Usage'
|
set xdata time
|
set timefmt '%s'
|
set format x '%tH:%tM:%tS'
|
# Please note this is in SI units (base 10), not IEC (base 2). So, for example, this would show a Gigabyte, not a Gibibyte.
|
set format y '%.0s%cB'
|
set datafile separator "|"
|
"""
|
)
|
for y_value, color, label in horizontal_lines:
|
print(
|
f'''set arrow from graph 0, first {y_value} to graph 1, first {y_value} nohead linewidth 2 linecolor rgb "{color}"'''
|
)
|
if label is not None:
|
print(f"""set label "{label}" at graph 0, first {y_value} offset 1,-0.5""")
|
|
# Include the horizontal lines in the range
|
if len(horizontal_lines) > 0:
|
print(f"""set yrange [*:{max(x[0] for x in horizontal_lines)}<*]""")
|
line_definitions = ", ".join(
|
[
|
f""""-" using 1:2 title '{gnuplot_escape(name)}' with lines"""
|
for container_id, name in sorted(labels.items())
|
]
|
)
|
print("plot", line_definitions)
|
for container_id in sorted(labels.keys()):
|
start_time = int(starting_time_per_container[container_id].timestamp())
|
for sample in sorted(samples, key=lambda x: x.instant):
|
if container_id in sample.stats:
|
print(
|
"|".join(
|
[
|
str(int((sample.instant).timestamp()) - start_time),
|
str(sample.stats[container_id].memory_usage_bytes),
|
]
|
)
|
)
|
print("e")
|
|
|
def gnuplot_escape(inp: str) -> str:
|
out = ""
|
for c in inp:
|
if c == "_":
|
out += "\\"
|
out += c
|
return out
|
|
|
def take_sample() -> Tuple[Sample, dict[ContainerId, ContainerName]]:
|
labels: dict[ContainerId, ContainerName] = {}
|
stats: dict[ContainerId, Stats] = {}
|
docker_inspect = subprocess.run(
|
["docker", "stats", "--no-stream", "--no-trunc", "--format", "json"],
|
stdout=subprocess.PIPE,
|
)
|
for container_stat in (
|
json.loads(l) for l in docker_inspect.stdout.decode("utf8").splitlines()
|
):
|
if not container_stat["ID"]:
|
# When containers are starting up, they sometimes have no ID and "--" as the name.
|
continue
|
labels[ContainerId(container_stat["ID"])] = ContainerName(
|
container_stat["Name"]
|
)
|
memory_usage = parse_mem_usage(container_stat["MemUsage"])
|
stats[ContainerId(container_stat["ID"])] = Stats(
|
memory_usage_bytes=memory_usage
|
)
|
for container_id, container_stat in stats.items():
|
logging.info(
|
f"Recorded stat {labels[container_id]}: {container_stat.memory_usage_bytes} bytes"
|
)
|
return Sample(instant=datetime.now(), stats=stats), labels
|
|
|
def parse_mem_usage(mem_usage: str) -> int:
|
parsed_mem_usage = re.match(
|
r"(?P<number>[0-9]+\.?[0-9]*)(?P<unit>[^\s]+)", mem_usage
|
)
|
if parsed_mem_usage is None:
|
raise Exception(f"Invalid Mem Usage: {mem_usage}")
|
number = float(parsed_mem_usage.group("number"))
|
unit = parsed_mem_usage.group("unit")
|
for multiplier, identifier in enumerate(["B", "KiB", "MiB", "GiB", "TiB"]):
|
if unit == identifier:
|
return int(number * (1024**multiplier))
|
raise Exception(f"Unrecognized unit: {unit}")
|
|
|
if __name__ == "__main__":
|
main()
|